In 1624 Peter Paul Rubens collaborated with Paulus Pontius to make an engraving after Rubens's 1618 painting The Assumption of the Virgin (below, left).
Step 1: Creating a Copy of the Painting
Pontius first drew a careful copy of the painting in black chalk over which Rubens made changes with pen and brown ink, brown and gray washes, and oil paint (below, right). Rubens balanced the composition of the painted original by adding more figures on the right-hand side, adding details that Pontius left out. Rubens effectively transformed the drawing into a small-scale painting, thereby challenging Pontius to capture his painterly effects in the engraving of the image.
|
 |
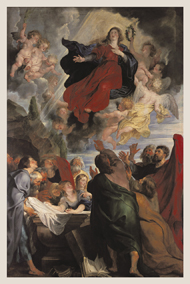

The Assumption of the Virgin by Peter Paul Rubens, oil on canvas, 1618
Gemäldegalerie, Stiftung museum kunst palast, sammlung der Kindtakademie Düsseldorf |
|
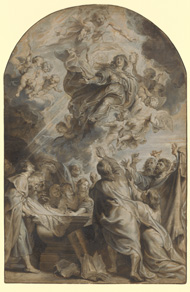
The Assumption of the Virgin, Peter Paul Rubens and Paulus Pontius; chalk, ink, wash, gouache, and oil paint; about 1624 |
|
Step 2: Transferring the Drawing to a Printing Plate
Once Rubens finalized the composition, Pontius laid the drawing over a copper plate and transferred the design by tracing the drawing over the plate with a sharp metal stylus. This detail of a putto's head photographed in raking light shows the indentations of the stylus. |
|
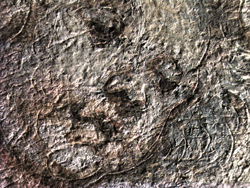
A detail taken under the microscope of Rubens and Pontius's drawing shows indentations of the stylus Pontius used to trace the design onto a copper plate. |
|
Step 3: Creating the Print
Using a metal burin (a sharp engraver's tool), Pontius cut the design into the plate. After this, he inked the plate, placed a damp piece of paper over it, and ran it through a press.
The result of this labor-intensive process was a reproductive engraving of Rubens's painting The Assumption of the Virgin, in reverse. The print allowed Rubens's revised composition to circulate to a wider audience.
|
|
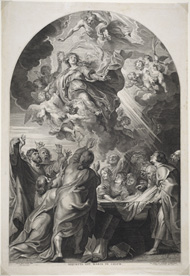
The Assumption of the Virgin, Paulus Pontius (after Peter Paul Rubens), engraving, 1624 |