• Reproduction of The Emperor's Private Mosque by Dr. John Murray
• Information about the featured work of art and Questions for Teaching
• Student handout: Light Waves and Camera Pinhole Illustration
• Empty cardboard oatmeal canisters
• Black spray paint
• Waxed paper
• Rubber bands
• Thick black paper, cut to the width of each oatmeal canister and the length plus two inches
• Small, thin pin or needle
• Masking tape
• Journals or bound paper for recording notes
• Pencils
• Drawing paper
|
 |
|
|
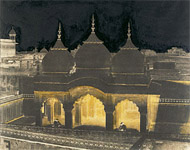
1. Ask students if they have seen or used digital cameras or camera phones. Tell students that taking pictures is much easier now because we simply push a button and see the picture right away. Display an image of Dr. John Murray's photograph The Emperor's Private Mosque. Tell students that while today's digital pictures are viewable instantly, early photographic images like Dr. Murray's had to be developed using special chemicals. Explain that this picture is a paper negative that was created with a camera. A negative is the image that is made with the camera, and the print is the positive image (opposite of the negative).
2. Use the Questions for Teaching to encourage students to look closely at the image. Explain that students will create a simple camera to learn about the type of basic tool that artists use to make photographs. Explain that the paper negative was created using methods similar to those they will be using in this lesson. Inform the class that light travels in a straight path and that humans learned to use light to create images on paper. Tell them that the word photograph means "to write with light," and that camera means "room." Therefore, when we take a picture with a camera, we are capturing light in a small dark room.
3. Students will create pinhole cameras. First, you will need to spray-paint black on the insides and outsides of empty cardboard oatmeal canisters. Spray paint works best for an even, thick coat of paint so that no light can come in from the sides of the canisters.
• Give each student a pre-painted oatmeal canister, a piece of waxed paper, a rubber band, a piece of black paper, and masking tape.
• With a pin, help students poke a hole in the center of the bottom of the canister.
• Students will center the waxed paper over the top of the can, wrap it around the sides, and secure it with a rubber band.
• Then students will wrap the black paper around the perimeter of the canister and align the edge of the paper with the bottom of the canister. At the top of the can, the paper should extend past the waxed paper top by at least two inches.
• Secure the paper to the can with masking tape.
4. Take the pinhole cameras outside. Point the bottom of the canister toward the school building. Have students look into the top of the canister and cup their hands around the edge to keep light out. Ask students the following questions:
• What do you see?
• How does the image compare to the way the building looks without the camera?
• How does the image change if you move closer to the object?
• How does it change if you move farther away? (The students should see the image on the waxed paper screen, but it will be upside down. As they move closer and farther away from the object, it will change in focus and size.)
5. Explain to students that light always travels in a straight path. When they look at an object through the simple camera, it is upside down because the light that hits the top of the object has to pass through the pinhole and will come out on the other side (the screen) in the opposite position. Have students fill in the handout Light Waves and Camera Pinhole Illustration to demonstrate the principle. Have students draw in the lines that represent the light waves by following the diagram.
6. Tell students they will capture the image of an important building, just as Dr. John Murray captured the image of the mosque. Point out that Murray created several pictures in India to document the architecture there. Tell students they will use the pinhole cameras to document the architecture of their school. Distribute pencils to students. Have students view their school building through the pinhole camera. Tell them to move around until they find an angle of the school building that they like. Allow them to trace the lines and shapes they see on the image of the building onto the waxed paper. Tell students that early cameras were often used to help people to draw. Also point out that breaking down the image into basic lines and shapes will help them to draw.
7. Instruct students to carefully remove the waxed paper from their pinhole cameras. Tell them they will use the sketch of the building as a guide to create a larger drawing of their school.
8. Display the finished drawings in a class book or on the classroom walls. Have students identify lines and shapes in their own drawings.
|
|
 |
|
| The Emperor's Private Mosque, Dr. John Murray, 1857–1860 |
|
|
|
Common Core Standards for English Language Arts
Grades 3–5
SPEAKING AND LISTENING
3.1 Engage effectively in a range of collaborative discussions (one-on-one, in groups, and teacher-led) with diverse partners on grade 3 topics and texts, building on others' ideas and expressing their own clearly.
3.6 Speak in complete sentences when appropriate to task and situation in order to provide requested detail or clarification. (See grade 3 Language standards 1 and 3 for specific expectations.)
4.3 Identify the reasons and evidence a speaker or media source provides to support particular points.
4.6 Differentiate between contexts that call for formal English (e.g., presenting ideas) and situations where informal discourse is appropriate (e.g., small-group discussion); use formal English when appropriate to task and situation. (See grade 4 Language standards 1 and 3 for specific expectations.)
5.1 Engage effectively in a range of collaborative discussions (one-on-one, in groups, and teacher-led) with diverse partners on grade 5 topics and texts, building on others' ideas and expressing their own clearly.
5.3 Summarize the points a speaker or media source makes and explain how each claim is supported by reasons and evidence, and identify and analyze any logical fallacies.
For more national and California state standards for this curriculum, refer to the charts found in the links at the top right of this page. |
|
|
|


